Cooking, dishes, cleaning, teaching (if you home school), laundry . . . these things can pretty much consume your days. And unless you are a lot better story teller than I am, the stories of the day are not so interesting.
Don't get me wrong, I am incredibly blessed to have the job I do, but sometimes I feel like if I really shared my days with people, I would end up looking into a lot of bored faces.
But they ARE my days.
And sometimes, even when you feel like what you have to share is incredibly boring, you still just want to share.
So at the risk of boring my readers, I am going to share how we do laundry around our house. (Okay, so I wrote this post last year, and am now just risking boring everyone!)
And at the risk of inviting comments and receiving none, I'd love to here how you do your laundry at your house. :)
I try to teach my kids to do as many "family jobs" around the house as they are able. From the time they are young, they are required to sort their own laundry into the appropriate laundry baskets. Before they are able to read, they know what each of the color coded tags mean on each basket, although I still do write the words. (I think it helps Ethan!)
I used to try to do 2 loads of laundry a day, but I was often discouraged about the non-stop piles of laundry cycling through the house that needed to be dried or put away.
Now, I attempt (*attempt*) to have all of my laundry done in 2 days - 3 if it takes a bit to dry.
Mondays, are my wash day. Since I have 7 loads that I do and only 4 laundry hampers, there is a small bit of sorting, but the majority has been done already throughout the week. My youngest enjoys tossing the last sorting of clothes into the washing machine with me.
Throughout the day, I have a number of laundry baskets that clothes get
dropped into straight out of the washer. In the summer, I would go
outside and hang up clothes on the line right after I threw the next
load into the washer. In the winter, however, the wet clothes
accumulate in baskets until evening. After supper, it's go time.
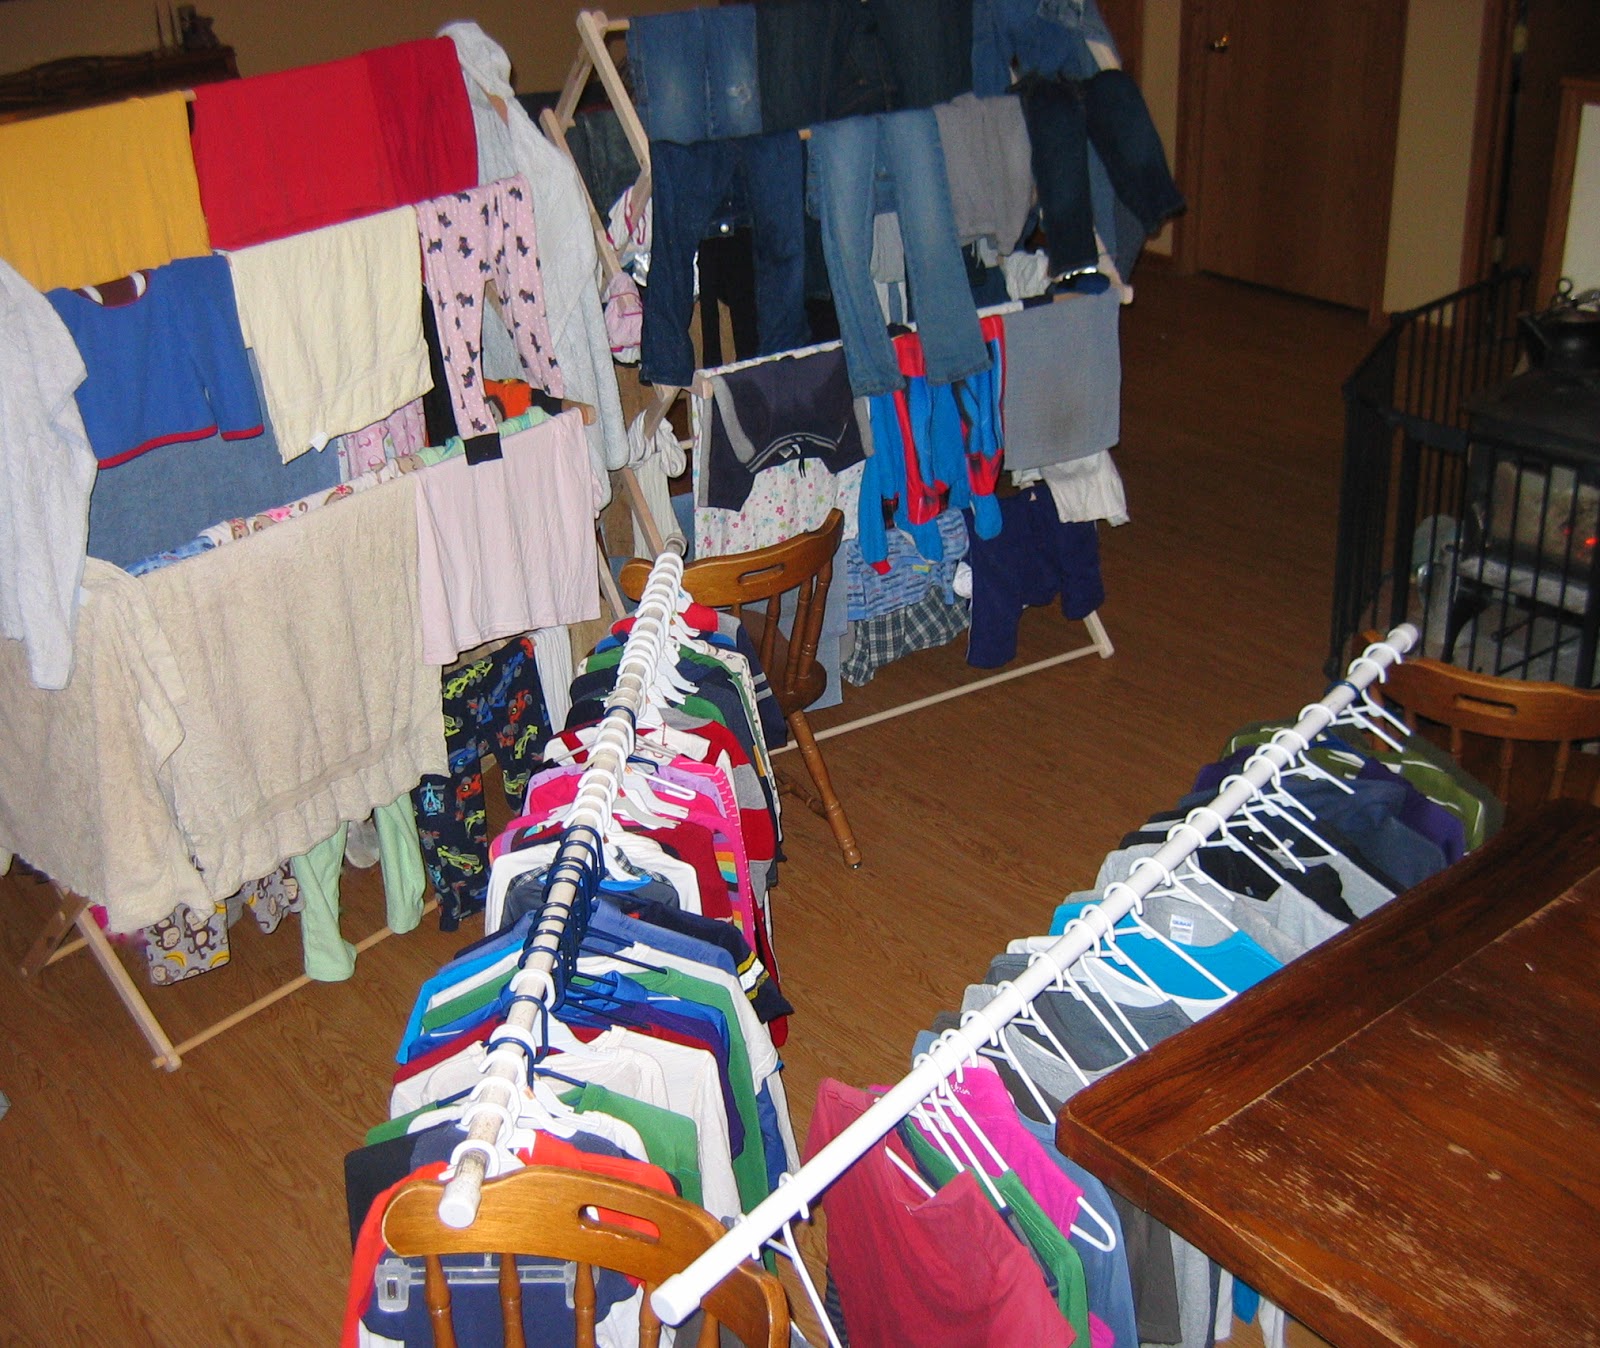
I have 2 closet poles that come out of the laundry room that get stretched between our dining room chairs. While I am setting this up, my kids are sent on a hanger hunt to collect all of the hangers from their closets.
We then turn on Pandora and have a little race. The kids have 5 songs to get their clothes that are hung in their closets put on hangers, their clothes that go in dressers in one laundry basket, and socks and wash clothes in a second laundry basket. Nothing really happens if they don't beat the song, but they enjoy the challenge - and it helps keep them focused.
While they are working, I am also working along beside them. I hang up Ethan and my shirts, hang all of the dresser clothes on our 2 taller-than-me Amish made drying racks which my mom gifted me (from the
settlement in Hazelton close to where I grew up), and finally throw the socks and wash clothes into the drier. Why do I only dry the socks and wash cloths? Dryers are expensive to run!
When we are done, this is what the area between the living room and kitchen looks like. (Can you see why I might enjoy summertime when clothes can be hung outside?)
Our wood stove, which is right by my drying area, is fired up with its drying heat, the 2
steam pots which supply our house extra humidity are removed from the wood stove, and the ceiling fans are turned on for the night.
When morning comes, I will pull off all of the dry clothes from the drying rack and rearrange the wet clothes on to one rack, letting me put one of the monstrosities away. The shirts on hangers (which are usually still slightly damp) are taken into the laundry room to be hung in designated spots for each person until they finish drying.
Once Tuesday evening rolls around, its time to put laundry away. Pandora is set to 5 more songs, and the sorting begins.
The dryer is emptied of socks and wash cloths, and the kids start sock sorting. Everyone has their own sock spot which the kids deliver socks to, as well as match up matches. Caleb and Hannah each have a bookshelf, Ethan has the couch, I have a blue chair and Isaac and Jonathan share the piano.
As they sort socks, I cycle around behind them and fold socks together. We also make a little race of this. I try to get all of the socks folded that are matched up before they get done, and they try to keep ahead of me. I have attempted to let them fold their socks together, but I have found that just leads to me sifting through dressers picking out socks that have came apart and are floating around. Maybe when they are older . . .
All of the laundry from the drying racks is also dumped out and folded. As it is folded, it is stacked on the back of the couch. Each of the kids has their spot on the couch where their folded clothes go. (Ethan and I have a spot on chairs and the towels on a bench.) When these spots are full, Caleb puts his clothes away and helps Isaac with his, and Hannah does the same with hers and Jonathan's.
Along with the clothes folding, is the diaper and wash cloth folding. (Okay, if you count the diapers and work wash clothes, there are 9 loads of laundry/week.) Isaac and even Jonathan (5 yrs old and just turned 3 yrs when this picture was taken) are pros at this job. As the wash clothes and diapers are folded, they are loaded up into a laundry basket to be carried to the bathroom and put away.
And not to be forgotten are those shirts. I usually leave them hanging in the laundry room one more night, but bright and early Wednesdsay morning they are placed on the kids' spots on the couch, to be whisked away into closets when they wake up.
And just like that, we are done with laundry until the next Monday morning. 5 beautiful laundry free days.
On a good week.
For some odd reason, I kind of enjoy hearing about how my friends do their laundry. Maybe it's because I find it facinating how each family has a different rhythm to making laundry work in their family . . . or maybe it's just in hopes that my life isn't that boring itself and someone enjoys hearing how I do laundry.
Either way, I'd love to have you share your laundry routine!
Follow The Beginning Farmer's Wife on Facebook for additional personal peeks at building a family farm.
Tools of My Trade
This folding drying rack is similar to the drying racks that were made by the Amish area where I grew up. They are wonderful for hanging multiple loads of laundry, sheets, towels, jeans, etc. Not only are they very sturdy, but they also allow for good air flow. I couldn't not use my dryer without one!
Although it isn't as heavy duty as some, this laundry hamper has served me well for the last 10 plus years. I also like the mesh bags which allow you to see in and allow any damp or soiled laundry to breathe.